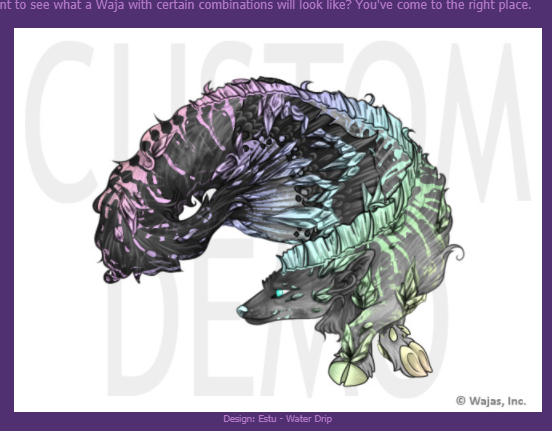
Lottery

Current jackpot:
2,540,000 WC
Last week's winner:
Tabby Sales
September 21, 2024
12:41am
Latest Forum Post: ๐ŸŒฑ Flower Valley๐ŸŒฑ in final
Home » News » News Post
How to post an image, Walkthrough
๐ŸŽ„ Sadi ๐ŸŽ„ January 8, 2021 2:59 pm
How to post an image
Please look over, even if you have the idea of how to do it.

Notes:

You CANNOT post an image directly from the demo, it will show as a blank image for everyone EXCEPT you.
You also CANNOT post an image directly from your computer. You must upload to a hosting site and then roll from there.
Blank images cannot be counted in contests. Lines of letters from trying to post images from your computer also won't be able to pass.
While I try to inform users if something is wrong, depending on the event, I don't always have the time to do so. So I figured I'd just post here so we can all be on the same page.

Starting Out:

I started with an image from the demo, since I figure that's where a lot of out issue's usually come from.

You can skip the next step or two if you're trying to upload an image for something else, just go straight to the upload site.

Step 1:

Hover over the image, and right click it.
Next, go down in the menu that popped up to "SAVE IMAGE AS".
Step 2:

This should pop up. You can name your image whatever you want, and then hit save.

Step 3:

Next go to your URL bar, and type in your image hosting site. I use imgbox and have thus far had no issues with it. Be aware, not all hosting sites are the same, and from here on out, I show how to use imgbox. Additionally, some are temperamental and can remove your images from being used on sites.

We can only judge images we see. So, if your hosting site removes your image, and submission time has ended and you can no longer edit things in, we cannot judge it, you lose out on prizes.

We do not allow editing of posts after the ending time to be fair to all users. We hate it for you if your hosting site does something, but ultimately we want to keep the grounds as fair as possible. So do your research on your image hosting site, make sure you understand why / when your images can be removed.


Step 4:

Hit upload Images. You can upload multiple images at once.

Step 5:
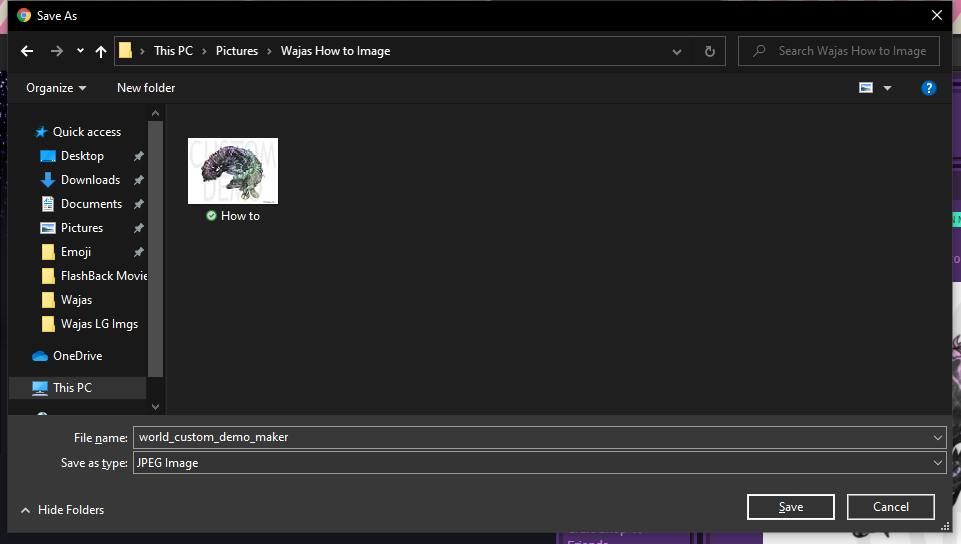
You will get this popup, find the image you were wanting to upload, click it, and hit open.
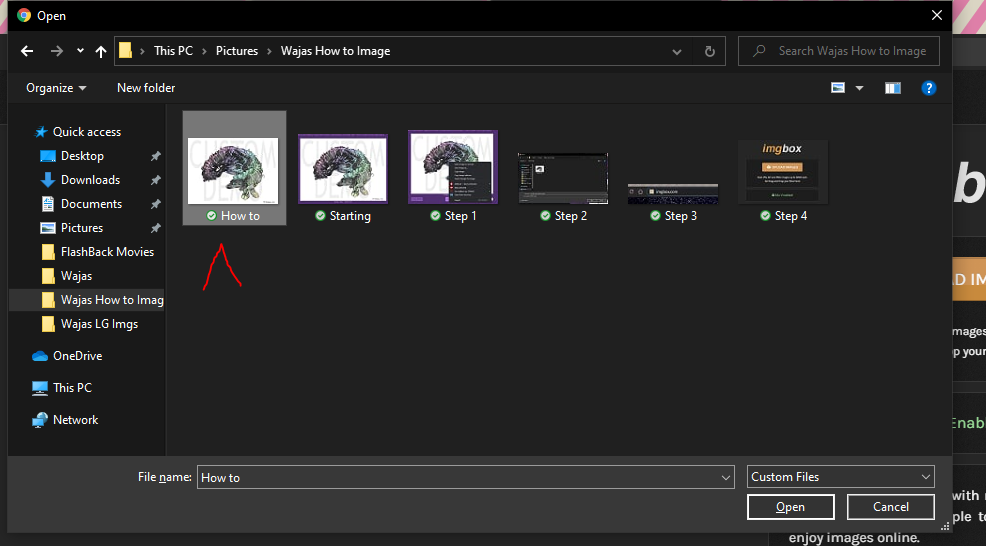
Step 6:

This hosting site asks for a lot of misc information, I've shown you how I fill it out above. Once done, hit upload.

Step 7:

It'll finally upload your image. Ignore all the links up top. These are 50/50 on if they work sometimes, and so it's easier just to rely on your own hard work.

Click the image it gave you.

Step 8:

When you click it, it will open a larger version of the image. Right click the image, and in the dropdown menu, go to "COPY IMAGE ADDRESS". This will give you a direct link to your image, and should work as long as you have the coding right when you post it.

Then return to where you want to post it on Wajas.

Step 9:

Now insert the code: <img src="PUT YOUR COPIED URL HERE">, and hit preview.

Step 10:

Voila! It worked. You're good to go.

Hopefully this little walkthrough thing helped. I am hoping to get a video up soon on the Wajas Youtube with basically all of this for those that learn better that way, since I know this was a lot.
 
There are 13 comments on this post